
You can create a crypto payment link without building a website checkout or writing API code. In GramPayBot, a payment link begins as a manual invoice: you choose an app, enter the USD amount and payment purpose, create the invoice, then send the generated checkout URL to the buyer.
The buyer uses that one page to see what they are paying for, select one of your enabled USDT or USDC routes, copy the receiving address or scan the QR code, and send the exact amount. You follow the result from the invoice instead of trying to reconcile a wallet address, chat messages and screenshots afterwards.
This guide is for a freelancer, agency, consultant or small seller who is ready to request a one-off crypto payment now. If you first need the category overview, read how crypto payment links work. If you are still choosing a process, compare a crypto payment link with a wallet address.
Before you create a crypto payment link
You do not need a website, API key or a custom payment page. You do need three things:
- A GramPayBot account.
- An app in the web cabinet or Telegram bot. The app keeps its invoices and payment settings together.
- At least one active payment wallet and route for that app.
The configured route tells checkout which token, network and merchant receiving address it may show. For example, you might enable USDT on TRON for one app and USDC on Base for another. Enable only the routes your business is prepared to operate; a token ticker such as “USDT” is not a complete payment instruction without its network.
The buyer sends funds directly to the wallet you configured for the chosen route. GramPayBot creates and tracks the invoice around that transfer; it does not ask for your wallet’s private key or hold the revenue in a merchant balance.
If your app does not have an active payment wallet, add one before creating an invoice. See how to configure wallets and networks.
Create a payment link in four steps
In the web cabinet, open Invoices and select Create invoice. In Telegram, open the app you want to use, go to Invoices, then choose Create invoice. Both paths create the same kind of tracked payment request.
USDTTRON · Base
USDCBase · Polygon
USDCBASE · ERC20
SEND EXACTLY1,000.013427 USDC
● WAITING FOR PAYMENTChoose the app that should receive the payment
Select the app that belongs to the sale. This is not a technical requirement just for developers: an app can represent a client-work workflow, a store, a product line or a team.
Using the right app matters because its configured wallets determine what the buyer can pay with. It also keeps your invoice list, payment history and any internal project context in the right place.
For a simple freelance workflow, one app such as Client payments is enough. If you run several businesses or want to separate personal consulting from store orders, create a separate app for each payment workflow.
Enter the amount and payment purpose
Set the agreed amount in USD. If a client owes you $500 for a design milestone, create an invoice for 500.00 USD.
The buyer’s checkout then shows the exact USDT or USDC amount for the route they select. Do not calculate a token amount in a chat message and do not ask the buyer to round it. The purpose of the invoice is to give the buyer one current set of payment details.
Next, write the payment purpose. This is the buyer-facing description shown in checkout, so it should make the request immediately recognisable.
Good examples:
Website redesign — 50% depositBrand identity — final milestoneMonthly consulting package — AugustProduct photography — order 184
Avoid vague descriptions such as Payment, USDT, or Invoice. They force the buyer to go back to the conversation to understand the request and make it harder for them to spot a wrong link.
Do not put confidential client information in this field. It is public to the buyer who opens the checkout.
Add a private note, then create the invoice
The optional private note is for your internal reference. The buyer does not see it in checkout.
Use it for the details your team will later search for:
- client or company name;
- order number;
- proposal reference;
- project code;
- a short reference to the sales conversation.
For example: ACME · PR-2026-041 · Maria.
The public description tells the buyer what they are paying for. The private note tells your business how to find and understand that invoice later. Keeping them separate prevents accidental disclosure while making payment reconciliation easier.
When the details are correct, select Create invoice. GramPayBot creates a unique invoice with its own public ID, enabled payment methods, checkout and status.
About the timer: in the current manual GramPayBot flow, a new invoice is active for 30 minutes. The web-cabinet form does not offer a per-invoice expiry setting. If the buyer cannot pay in time, create a new invoice instead of asking them to use an old one.
Copy the checkout link and send it
After the invoice is created, the cabinet displays the hosted checkout URL. When the Mini App option is available, it also displays a Telegram Mini App link for the same invoice.
Open the hosted checkout once before you share it. You are not making a test payment; you are checking that the page reflects the deal you just agreed.
Confirm that it shows:
- the correct payment purpose;
- the intended USD total;
- only the USDT or USDC routes you enabled;
- the current countdown;
- the expected receiving address after a route is selected;
- the
waitingstatus.
The buyer checkout guide explains the buyer-facing page in more detail.
Send the link without creating conflicting instructions
This example uses a labelled merchant-site illustration and actual current GramPayBot screens to show how the order, checkout and paid invoice retain the same reference:
Actual GramPayBot UI captured from the current product with synthetic data. The merchant website is an illustrative integration.
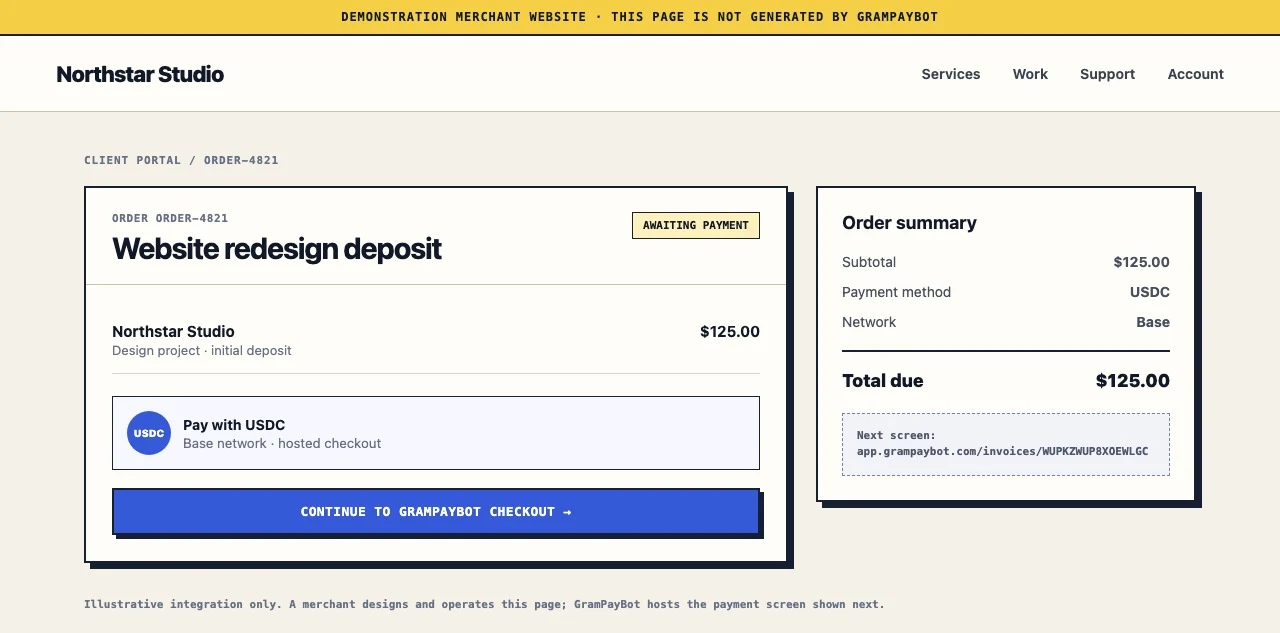
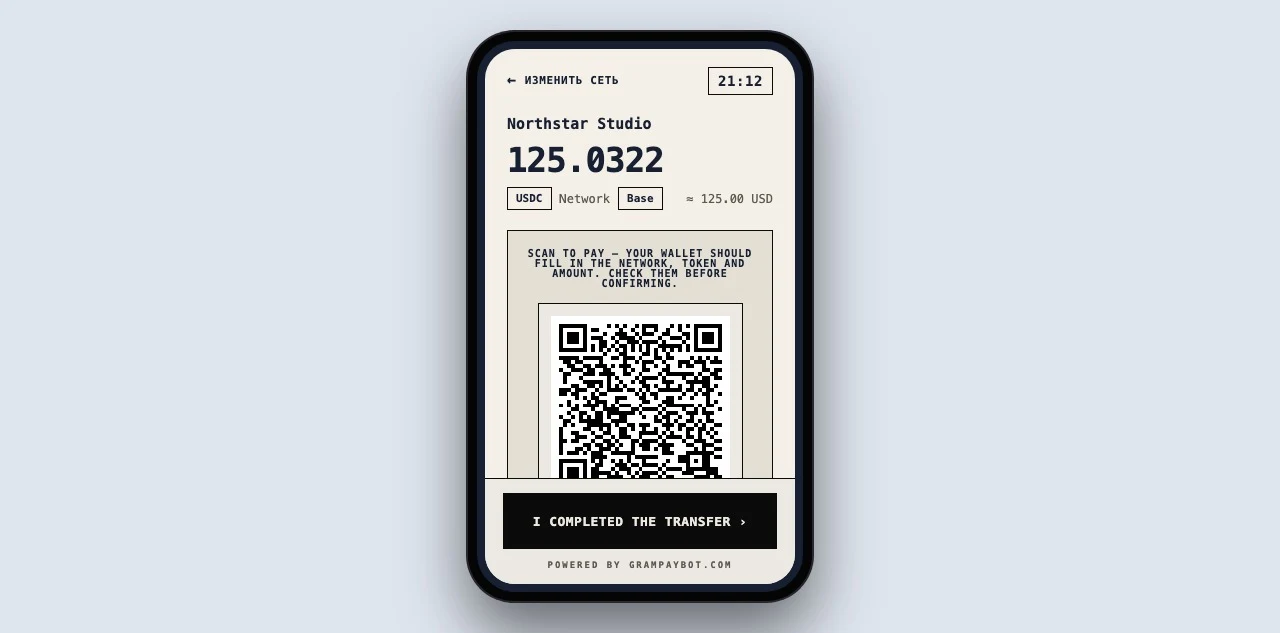
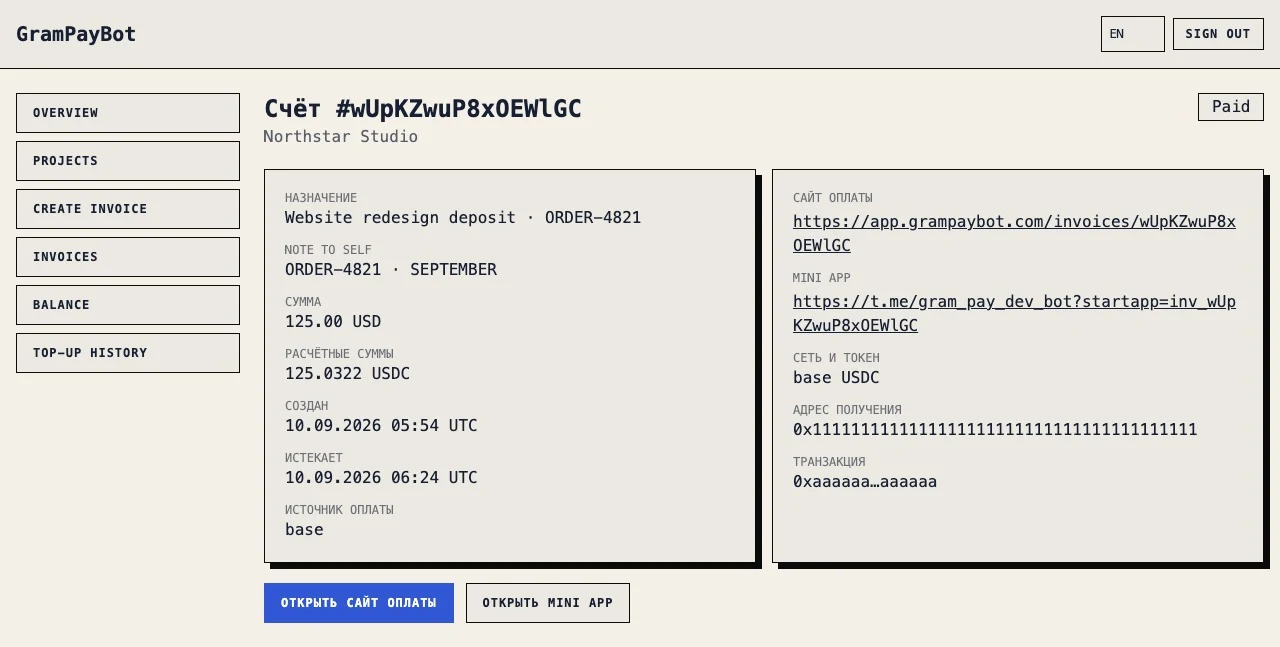
Send the payment link through the channel where you closed the sale: Telegram, WhatsApp, email, a proposal or another business messenger. The link works as the payment request; the surrounding message should add context, not duplicate or contradict its details.
Do not paste an alternative wallet address beside the URL. Do not write a token/network combination that differs from checkout. If the payment instructions live in two places, the buyer may follow the wrong one.
Use this chat message:
Here is the payment link for the approved milestone: [payment link]
Please check the payment purpose, token, network and exact amount in checkout before sending.
For email, use a little more context:
Subject: Payment link for [project or milestone]
Hi [name],
Here is the payment link for [short description]: [payment link]
Checkout shows the exact USDT or USDC amount and the available network. Please complete payment before the timer expires.
Thank you.
If you sell mainly through Telegram, see the dedicated workflow for accepting crypto payments in Telegram.
What the buyer does after opening the link
The buyer opens a hosted checkout instead of receiving a bare address in a chat. The page shows the invoice purpose and USD total, then lets them select from the token and network routes you enabled.
After a route is selected, checkout displays the exact token amount, recipient address and QR code. The buyer should use the same token and network in their wallet or exchange withdrawal flow, then send the exact displayed amount.
The QR code makes the details easier to open or copy, but it does not remove the need to review them. The buyer remains responsible for approving the correct token, network and amount from their wallet.
Follow the invoice status before delivering work
Creating a link is only the start of the workflow. Return to the invoice in the cabinet or bot to follow the result.
- Waiting: the invoice is active and no qualifying payment has been matched yet.
- Paid: a qualifying transfer has been matched and recorded for this invoice.
- Expired: the payment window ended before a qualifying transfer was matched.
- Cancelled: the seller closed the request; the old link should not be used.
Do not fulfil an order from a screenshot. Wait for the invoice status to become
paid, or follow your exception process if the payment has not been recognised. A screenshot and a transaction hash can be misleading, incomplete or related to another payment.
For a detailed verification checklist, see how to verify a crypto payment and avoid fake screenshots.
Common mistakes when creating a crypto payment link
Sending the same link to several customers
Create one invoice per payment request. A unique link gives you a clear amount, purpose, status and payment record for that sale. Reusing one active invoice for different clients makes reconciliation ambiguous, even if the price is the same.
Leaving the description too vague
“Payment” does not help a buyer recognise the request. Use a concise service, product or milestone name that a real customer will understand at a glance.
Assuming that every USDT payment is equivalent
USDT and USDC exist on more than one network. A real transfer on the wrong network, to another address, or for a different token does not satisfy the payment conditions of your invoice. Leave route selection in checkout and make sure the buyer checks it before sending.
Sending an old or expired link
An expired invoice is not a request to “send anyway.” If the commercial terms are still valid, issue a new invoice and send the new checkout URL. This gives both sides a current amount, deadline and payment record.
Treating an exception as automatically resolved
An underpayment, overpayment, late transfer or wrong-network payment may need a manual decision. The link makes the expected conditions clear; it does not reverse blockchain transfers or decide a commercial dispute for you.
Payment link or website/API flow?
Manual payment links are the right starting point when a person agrees each sale, creates the invoice, sends the URL in chat or email, and can review unusual cases.
Use a website/API flow when your own system needs to create invoices automatically from orders and react to payment results without someone manually issuing every request. If orders already originate on your website, see how to accept crypto payments on a website.
Create your first tracked USDT or USDC payment link
A payment link turns an agreed sale into one clear request: amount, purpose, payment route, expiry, checkout and status. Create a separate invoice, send one URL and follow the tracked result instead of chasing payment evidence through a conversation.
Open GramPayBot in Telegram to create your first invoice without code. You can also explore the complete payment-links and invoices workflow and review current pricing.
Next step
Create a tracked crypto payment link
Issue a USDT or USDC invoice manually, send one hosted checkout and follow its payment status without an API.
Explore payment links →